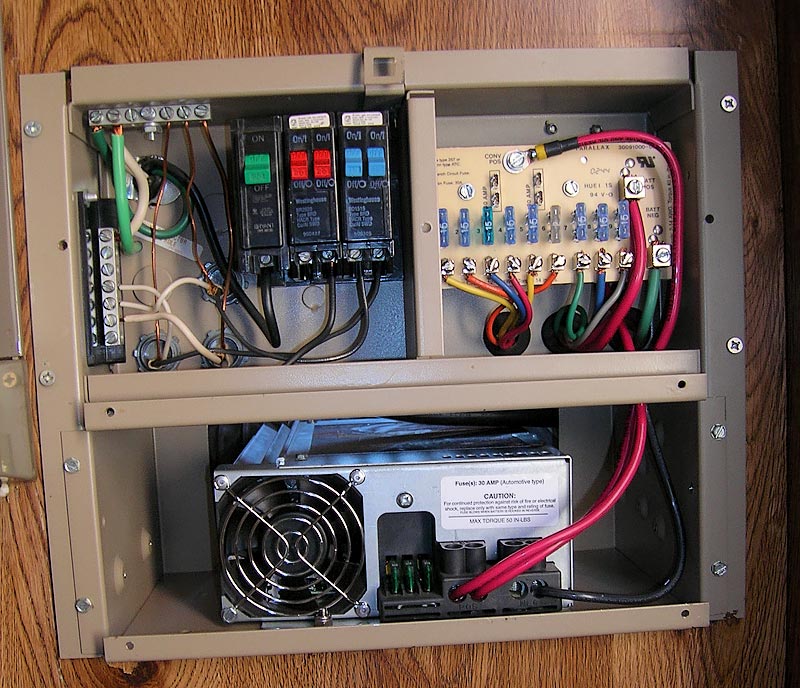
Converter UpgradeBefore you do any work on your electric system you MUST disconnect your coach battery AND make sure you are disconnected from any AC power. In fact, this would be a good time to completely remove your coach battery and check the cells for proper fluid level. Add distilled water if they are low. This install tutorial will go over replacing the original model 6300 Magnetek 25 amp converter charger which will be found in most Toyota Motor homes (and many other motor homes and travel trailers) with a Progressive Dynamics PD9280 80 amp charger/converter with the built in Charge Wizard circuitry. The Charge Wizard moniters the battery and selects one of four posable charging modes depending on the condition of the battery. For more info on how the charge wizard works visit the Progressive Dynamics web site. You can click on any of the pictures in this tutorial to bring up a much larger popup image.
Once you have the cover off you can remove the 3 wires for the AC side of the converter. The black wire will go to the breaker marked "Converter", the white wire will go to the neutral terminal block, and the bare copper wire will go to the ground terminal block. Remove all of the wires going from the old converter to the DC distribution buss board. You will have to take off the 2 screws that hold the DC distribution buss onto the converter housing and pull the DC buss board forward to get to the terminals where the positive and negative converter cables are attached.
Using an electric drill with the proper sized bit, drill out all of the pop rivets which hold all of the converter components onto the converter case. Remove them from the housing and discard them as they have no value. You will need to take the old converter housing to a vice or anvil and, using a large ball peen hammer, flatten the 2 raised press points in order for the new convert to fit flush on the new housing tray you will be making from the back of the housing.
If you have opted for the biggest bang for your buck and purchased the largest converter charger that Progressive Dynamics makes you will need to do a little fabrication before you can mount the new unit in your distribution panel. Now a lot of people would just toss out the old housing and screw the new converter down somewhere inside of the cabinet and be done with it but not me....
Take the housing to your trusty anvil or vice, grab your favorite LARGE ball peen hammer once again and beat the top lip flat. Then gently beat the back flat, being CAREFUL that you do not break the spot welds that hold the back onto the bottom of the housing. Then give the 2 pressed dimples another good whacking to ensure that you flatten them so that the entire bottom and newly made flap are completely flat and ready to take the new 80 amp converter.
If your converter sets over your wheel well under the closet you will need to add a 1 1/4" spacer which will rest on the wheel well and support everything nicely. If your converter is mounter somewhere else, take the housing to its location and measure for the proper size support spacer. The metal is thick enough and strong enough to support the converter but it would be best to give it some rear support to avoid it bouncing while you are driving. The weight of the converter will hold it down and keep it in contact with the floor.
Surprisingly the converter fits perfectly inside the housing, going from just behind the front to the exact end of the flap you made. Opening up the back of the case and allowing the converter to spill over also helps with the cooling of the converter. You can either cut off the 20 amp plug end and wire the converter directly to one of the 20 amp breakers or you can wire in a single outlet 20 amp outlet and just plug in your new converter to AC. I choose to mount a new box and 20 amp outlet. NOTE: The 80 amp converter REQUIRES a SEPARATE 20 amp circuit NOT 15 amp like the old one did. Personally, I mounted an outlet and the converter cord plugs directly into it.
This is a very inexpensive upgrade and one that is worth the time and effort since you have everything in a million pieces anyway. The new buss board will add 30 amp main DC fuses and pass filtered DC to all 9 of the circuits instead of just the first 2
Once you have all of your branch DC circuits moved over to the new DC distribution buss board you can bring in the new DC supply wiring from the newly installed converter charger. You will want to bring a positive and negative wire into the back of the new buss board which are behind the main battery positive and negative wires on the front of the DC buss board. You will also need to bring up a secondary positive wire for the distribution supply. Once you have all of your DC mains and branch circuits connected and your AC supply installed (either by hard wiring the converter directly to an AC breaker or installing a separate 20 amp supply line and 20 amp plug) you can reinstall your coach battery and button everything up, plug in to an AC supply outlet and throw the breakers. Use a DMM or analog multi meter to make sure that the converter charger is supplying power to the battery by checking the voltage at the positive and negative battery supply on the front of the new DC buss board
Tomorrow's adventure.... Adding an Onan 2.8 kw genset, a 1.8kw AC inverter, and a transfer switch (oh boy)
|
 "Remove the 4 screws that hold the cover on")
 "Remove the old converter from the housing")
 "the 9280 is TOO big for the old housing")
 "Chop the back loose from the housing")
 "If your converter sets over the wheel well ad a spacer for support")
 "Replace the top")
 "New DC buss")
 "Take one wire at a time from the old buss to the new buss")